Tuesday 12 July 2016

Realistic Human Head in Zbrush and Maya

It's one of those CG cliches, model a realistic human head. So of course I had to have a go at some point. I got that chance last year when I had time and while I was getting more into ZBrush.

So to start with I laid out the the polygon loops over the reference image in Photoshop first to plan out my build -


The image ref was some old free human reference from the awesome site www.3d.sk

I did the initial modeling in Maya to create a base mesh.


I then brought the model into ZBrush and began adjusting some forms, some aspects of the head shape, enlarged and brought out the ears a little more and added some asymmetry.


Once I was happy with the forms at this point I went back to Maya to create the UV's (created in a 2:1 ratio to get maximum pixel detail). I then brought it back to ZBrush to continue detail modeling, mainly with alphas to create the small wrinkle and pore detail. Once I had that finalised I created my displacement and normal maps. There was not so much exagerated modeling (overlapping geo) that required a vector displacement so went with the standard height map.

I baked out at 8 x 4k and then did some cleanup on those maps in Photoshop. I've since found out that MudBox does a great job on displacement and normal baking (smoother result with better results at UV seams) so will probably go back to it at some point to create cleaner maps, but they were perfectly fine as is.


I then started the polypaint process. The model's highest subdiv level was 7 and at that level has a point count of 7.2 million, which is plenty to get some good detail into the texturing. I started with the overall colour tones and then started to bring in subtle vein and wrinkle detail along with freckles and other skin blemishes always keeping reference close at hand.


PolyPaint wip


Wire Diffuse and Spec Maps


Once I was happy I converted the polypaint to texture and then did my final tweaks in Photoshop and also created a spec map from that diffuse map (which was adjusted later as I went through the shading process). I also created a colour map for each sub dermal layer for the sss shader.

So then the base model was brought back to Maya for shading and lighting. I also created an eyeball at this stage with associated maps. I used mental ray shaders, the fast skin for the most part, just using a mia material x for the eye lenses. For lighting I used an IBL dome with an HDRI attached along with two area spotlights (area light settings in the mental ray tab of those lights along with a custom light shader node for shape of the light source though a ramp node)


So next is the hair which is currently a work in progress. I have created the eyelashes and for the hair I think I'm going to use a Fibermesh workflow and bring back to Maya and use the standard Maya paintfx hair. Why not use XGen you ask? Well I have already dabbled with it and it's great for the initial groom but with mental ray the quality of the shader just isn't great. I think I can get a better look with paint fx. But I'll see, maybe they'll improve the mental ray hair shader to match Arnolds one at some point. 

So hope you enjoyed this short overview of my head model, I'll post the hairy head when it's done.


Wednesday 9 March 2016

Classical ZBrush Sculpt

This is my first proper human anatomy study done in ZBrush. It s based on the Discolobus of Myron - https://en.wikipedia.org/wiki/Discobolus - my particular version is closely modeled on a version of the Townley discolobus at the British musuem.
It was created in ZBrush from scratch using ZSpheres as a base. When the sculpting was finished I exported mid sub div level meshes from ZBrush and re-topologised in Maya using quad draw. I then UV unwrapped the retopologised meshes and imported back to ZBrush for projecting the detail. I then baked out displacement, normal and various masking maps.

Texturing was done with a combination of Photoshop and Mudbox, Mudbox was great for painting out seams. Actually in the end I used mudbox for baking the final displacement and normal maps ( so much better than zbrush for that - no seams etc).
I then shaded and rendered the model in Maya using mental ray. Hope ya like.


Final ZBrush sculpt


Timelapse of ZBrush build


Re-topologised mesh in Maya


Final textured and shaded render in Maya


Final textured and shaded render in Maya


Final textured and shaded render in Maya

Tuesday 12 January 2016

CG Water FX

I've always been messing about with water stuff in my cg work, so I'm just posting a few vids here with some examples of that. Click on the images below that will link to the videos on vimeo


This is a short underwater sequence I created in Maya. I used the hot ocean deformer for the mesh waves and created a camera with motion to simulate floating. Then added a mia material with water preset and tweaked some of the values. Also added a simple fog for depth. Then comped in After Effects adding particles, DOF, motion blur, light shafts and grain and finally sound.


Created this simple setup to test a water shader and fake caustics. The caustics is a tileable and loopable image sequence created with caustics generator (can create 512x512 sequences free). The water is a mia material with a ocean displacement in the shader group. Did some After Effects jiggery pokery to add some umph.


Created this a couple of years back. Wanted to look at using particle flow in 3DS Max to create a swarm and decided to use fish. Then got carried away and went further with it. The fish is a free turbosquid model. I adjusted the model slightly for animation purposes and also adjusted the texture. All rendered in mental ray and then comped in After Effects to add the light shafts, motion blur etc

Monday 14 December 2015

Yet more paintings

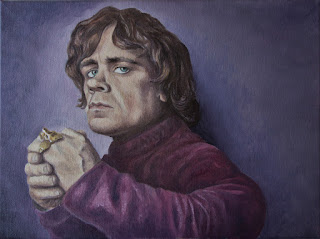
Here are three paintings done over the last couple of years, I'm putting a bit more info with these as I haven't done so with previous posts. Also I have a couple of work in progress images, they were taken on my phone, so forgive the low quality.


Peter Dinklage - Acrylic and Oil on canvas - 16x12"
(Photo ref: Gavin Bond for TV Guide Magazine)


Work Progression


Sea Painting - Andreas Achenbach Study - Oil on canvas - 16x12"


The Gooch (Colm Cooper) - Kerry Footballer - Acrylic on Canvas - 18x24"


Work Progression

Summer Sketches and Creature Designs

Time to post some 2D work again, I've compiled and composed some pencil sketches done last summer 2014, most of which was located in St Stephens Green in Dublin. I also had some creature sketches in the same sketch book along with a few sketches from the Natural History Museum in Dublin. Enjoy!


Monday 27 July 2015

Arnold Lighting

First post in quite a while, apologies for the long break. Just wanted to put up some renders of a fruitbowl, which was part of lighting course in Arnold for Maya with tutor John Huikku, really cool dude who's worked at Disney and Weta and now at Brown Bag Films. The model was based on the fruitbowl challenge at 3Drender.com but I adjusted the modelling on most of the fruit and created new UV's and textures (diff, bump, spec) for all fruits except the apple, that's Kevin O Brien's.
Anyway, arnold is awesome, so straightforward as a rendering tool, nothing overly fancy. You can get advanced like any other renderer, but it's very easy to get to grips with, especially the shaders and creates fairly stunning results.

Here's a few renders along with a GIF to show some wip shader adjustment as I went.


Sunday 14 April 2013

Sketchy Work

Here are a few sketches that I have done over the years, some of these stretch back to the early 90's. The Arnie and Jennifer Lawrence sketches are the most recent, just doing a couple of hour long sketches from an Empire magazine.
I was a big fan of Albert Uderzos work for the Asterix and Obelix comics so I used to do a fair bit of copying of his stuff back when I was in school. The rest are random pages from my sketch books. Hope you enjoy.
All presented in no particular order.